

🎁 How to apply the TRX Training Discount Code

The TRX exercises that help most with an everyday stiff or sore lower back are the ones that get your hips and upper back moving again and teach your trunk to hold steady while they do: the TRX Squat, a supported hip hinge, the TRX High Row, the TRX Hip Press, a plank you can actually hold, and three or four gentle stretches. Do them slowly, inside a range that feels comfortable, two or three times a week. If your pain came on suddenly in the last few days, keep moving gently with short walks and the stretches below, and stop anything that sends pain down your leg. Most new lower back pain settles over a few weeks on its own, and exercise is one of the first treatments doctors recommend once it lingers (American College of Physicians guideline).
Disclosure: This post contains affiliate links. If you buy through them, I may earn a commission at no extra cost to you — and you get 15% off with my code TRX15LUKAS. I only recommend gear I actually use.
If your day goes car, desk, car, couch, your lower back is probably doing the hips’ job and the upper back’s job on top of its own. That’s not damage, it’s a habit your body has learned, and habits can be retrained. The workouts below are built around that idea.
New to the straps? Read what a TRX Suspension Trainer actually is, and set up a safe anchor point before you lean any weight on it.
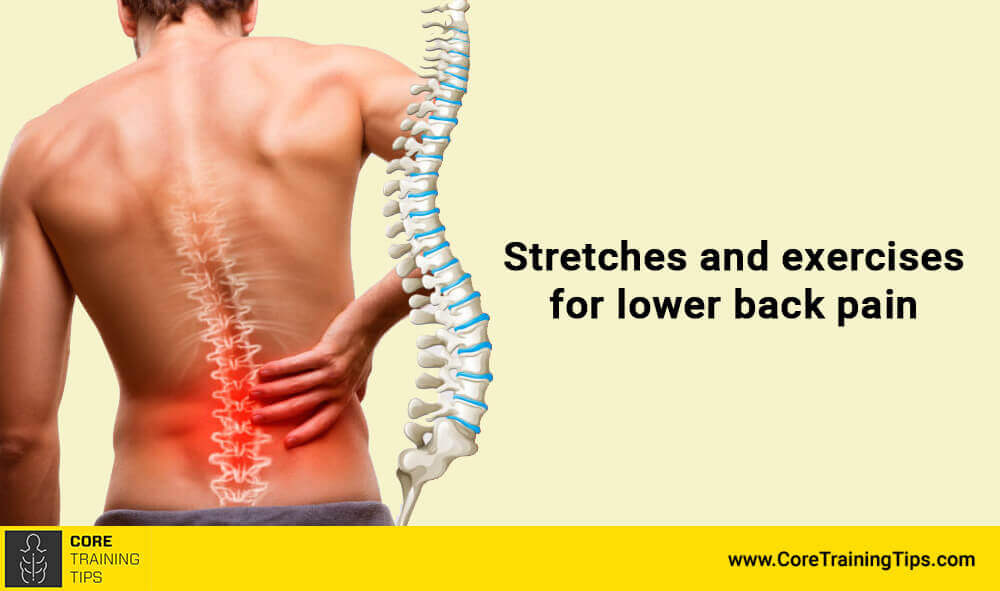
Who these exercises are for (and who should see a doctor first)
They’re for you if your lower back feels stiff, tired or achy after long days of sitting, driving or standing, if it loosens up once you move, and if you want a short routine you can repeat at home or in the office. They also suit you if you’ve already been cleared by a doctor or physical therapist and want a way to keep training at home.
They’re not a substitute for a diagnosis. Skip the workout and get checked first if you have any of these warning signs, which the U.S. National Library of Medicine lists for low back pain (MedlinePlus):
- Pain after a hard fall or a blow to the back
- Loss of control over your bladder or bowels, or numbness in your buttocks, groin or inner thighs
- Weakness or numbness in a leg, or pain running down your leg below the knee
- Fever, or unexplained weight loss, together with back pain
- Pain that wakes you up at night or gets worse when you lie down
- A history of cancer
- Pain that hasn’t improved after about four weeks
If you have a diagnosed disc problem, recent surgery or you’re pregnant, show this workout to your physical therapist and let them strike out what doesn’t fit you.
- The lumbar spine is built for stability more than range. Its five vertebrae are large and their joints allow only a little rotation, segment by segment. The hips and the thoracic spine (your upper back) are the parts built to move freely.
- Sitting takes movement away from exactly those parts. Hours in a chair keep the hip flexors in a shortened position and leave the glutes with almost nothing to do. The upper back rounds forward with your arms on the keyboard.
- The deep core is a team, not one muscle. The transversus abdominis, the multifidus along the spine, the diaphragm and the pelvic floor work together to stiffen the trunk before your arms and legs move. The plank and the hinge below train that timing.
- Every strap exercise starts with a straight line. On a suspension trainer you lean into the straps, so your body has to stay rigid from head to heels for the movement to work. That turns ordinary squats and rows into posture practice.
Why it works: many coaches describe the body as alternating stable and mobile segments. It’s a coaching model, not a diagnosis, but it explains why the moves below focus on hips and upper back: when those move well again, the lower back can go back to its main job of holding steady.
How a suspension trainer helps and what it can’t do
The straps hold part of your body weight. That’s the whole trick for a sore back. You can sit back into a squat or hinge at the hips with your hands on the handles, so the movement is supported instead of loaded, and you choose how much support you need just by changing how far you lean. Walk your feet toward the anchor and the exercise gets easier. Walk them away and it gets harder.
What it can’t do is fix a structural problem or replace a diagnosis. There’s no good research showing that TRX training treats back pain better than other kinds of exercise. What the evidence does support is exercise in general: for chronic low back pain, guidelines from the American College of Physicians and from NICE in the UK both put exercise among the first options. The straps simply make that exercise easy to scale and easy to do at home.
10 TRX exercises for lower back pain
Do them in this order. The first moves wake up your legs and hips, the middle ones build the trunk, and the last ones are stretches to finish. Move slowly, breathe out on the hard part, and keep every rep inside a range that feels comfortable. Mild stretching or muscle effort is fine. Sharp pain, or pain that spreads down a leg, means stop.
1. TRX Squat
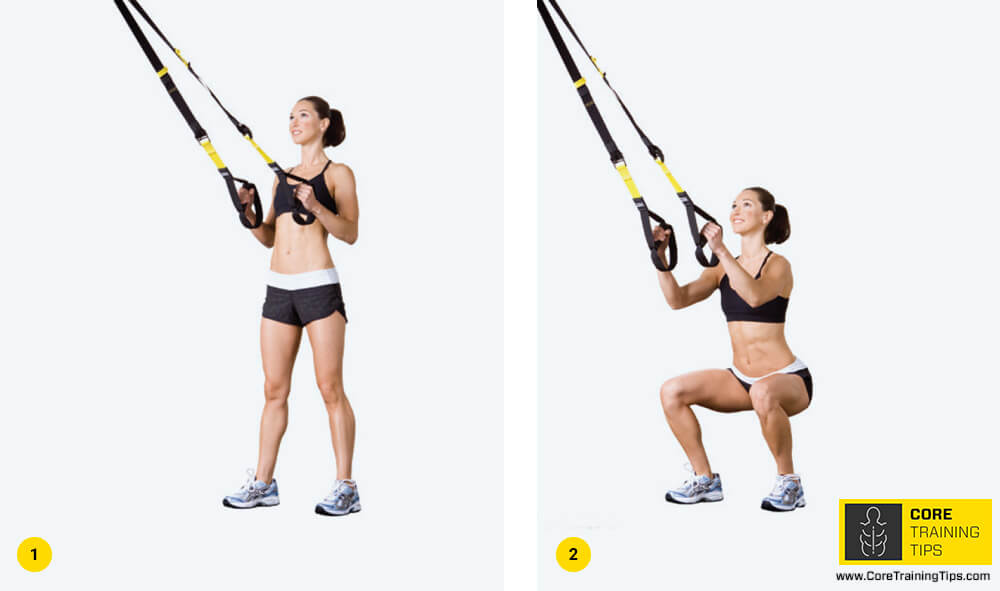
Setup: mid length, facing the anchor, feet hip-width apart, arms straight in front of you.
How to do it: lean back until the straps are taut. Push your hips back and down as if you were sitting on a low chair, keeping your chest up and your back long. Stand up by squeezing your glutes. The straps take some of your weight, so you can sit deeper than you could on your own without rounding your lower back.
Sets & reps: 2–3 × 10–12, or 30 seconds.
Common mistake: pulling yourself up with your arms. The arms only steady you, the legs do the work.
Easier / harder: squat to a box or chair behind you / step your feet a little back from the anchor and use the straps less.
2. TRX Hip Hinge Stretch

Setup: mid length, facing the anchor, feet hip-width apart, an overhand grip on the handles.
How to do it: walk back until your arms are straight and the straps are taut. Push your hips back and let your chest lower toward the floor until your arms are in line with your back. You’ll feel a stretch along the back of your thighs and the back of your trunk. Breathe slowly for three or four breaths, then stand back up by driving your hips forward.
Sets & reps: 3–5 slow reps, holding each for 3–4 breaths.
Common mistake: rounding the lower back to go deeper. The stretch should come from the hips moving back, not from the spine bending.
Easier / harder: bend your knees slightly / let one hand drift down to rotate gently toward the floor for an extra stretch through the side.
3. TRX Plank
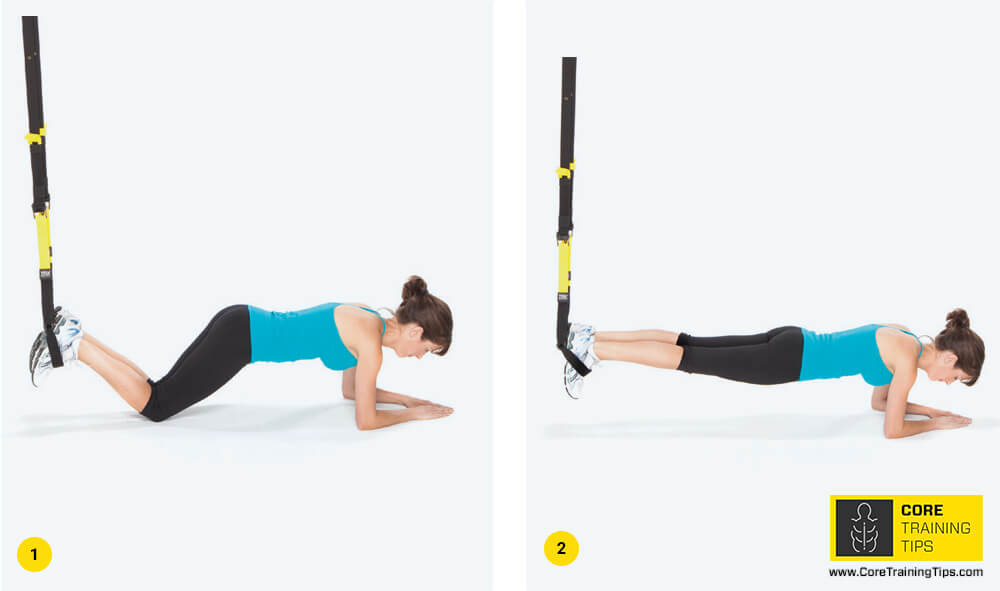
Setup: mid-calf, facing away from the anchor, toes in the foot cradles, forearms or hands on the floor under your shoulders.
How to do it: lift your hips until your body forms one straight line from head to heels. Push the floor away, keep your shoulder blades wide and breathe behind a braced belly, as if someone were about to poke your stomach.
Sets & reps: 3 × 15–30 seconds. Quality beats time.
Common mistake: letting the hips sag. That’s exactly the position that loads a sore back. End the set the moment the line breaks.
Easier / harder: a plank on your knees on the floor, without the straps / bring your knees toward your chest one at a time, slowly.
4. TRX Supine Plank
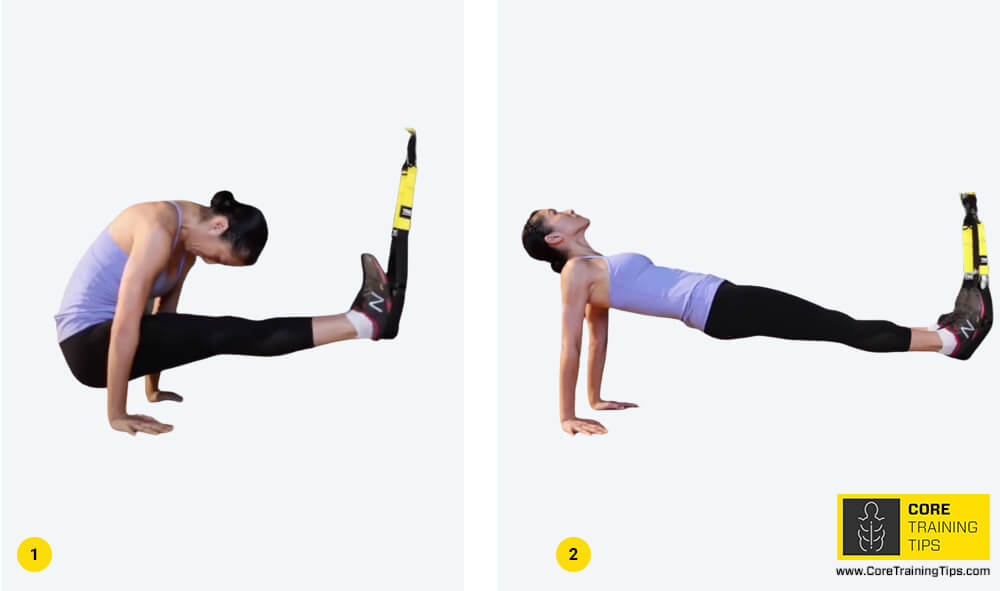
Setup: foot cradles hanging about 12 inches off the floor. Sit facing away from the anchor, heels in the cradles, hands on the floor behind your hips with your fingers pointing toward your feet.
How to do it: press through your hands and heels and lift your hips until your body is in a straight line from shoulders to heels. Hold, breathing slowly. This works the whole back of your body, from the glutes and hamstrings to the muscles along your spine, and opens up the front of your chest.
Sets & reps: 3 × 15–30 seconds.
Common mistake: pushing the hips too high and arching the lower back. Stop at a straight line.
Easier / harder: keep your heels on the floor without the straps / lift the hips up and down slowly instead of holding.
5. TRX Standing Hip Drop
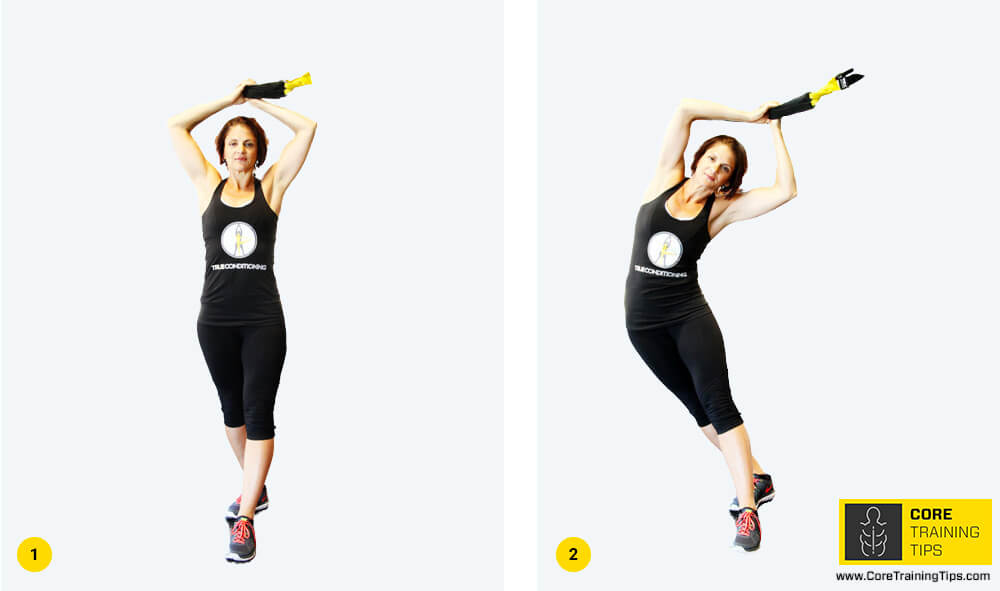
Setup: mid length, standing sideways to the anchor, both hands on the handles above your head, feet together.
How to do it: keeping your arms long, let your hips drift out to the side, away from the anchor, so your body forms a gentle curve. You’ll feel the stretch along the side of the trunk closest to the anchor. Pull your hips back to the middle using your obliques.
Sets & reps: 2 × 8 per side.
Common mistake: twisting. Keep your chest and hips facing the same way the whole time.
Easier / harder: a smaller drop / stand a little further from the anchor.
6. TRX High Row
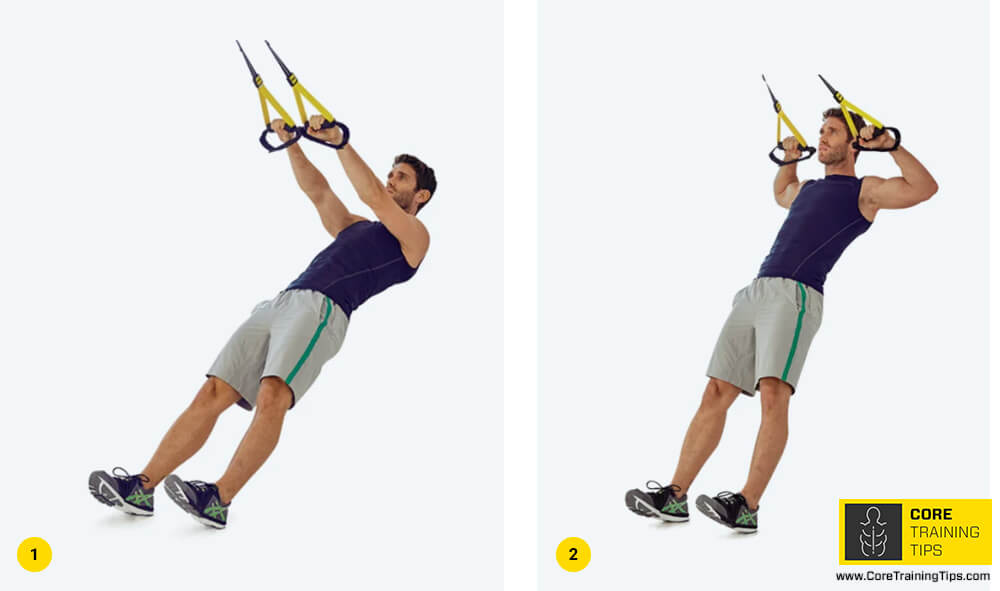
Setup: fully shortened, facing the anchor, arms straight in front of you, knuckles up.
How to do it: lean back with your body in a straight line. Pull your hands toward your face with your elbows high and wide, squeezing your shoulder blades together, then lower slowly. This is the antidote to the desk hunch: it trains the upper back muscles that pull your shoulders back.
Sets & reps: 3 × 10–12.
Common mistake: sticking the hips back or letting them sag. If you can’t keep the line, walk your feet back.
Easier / harder: stand more upright / walk your feet closer to the anchor.
7. TRX Hip Press
Setup: mid-calf, lying on your back under the anchor, heels in the foot cradles, knees bent at about 90 degrees.
How to do it: press your heels down and lift your hips until your body is in a line from shoulders to knees, then lower slowly. Your glutes and hamstrings do the lifting, which is exactly what they stop doing after a day in a chair.
Sets & reps: 3 × 8–12.
Common mistake: pushing up with the lower back. Squeeze your glutes first, then lift.
Easier / harder: a glute bridge on the floor with feet flat / pull your heels toward your hips at the top for a TRX Hamstring Curl.
8. TRX Torso Rotation
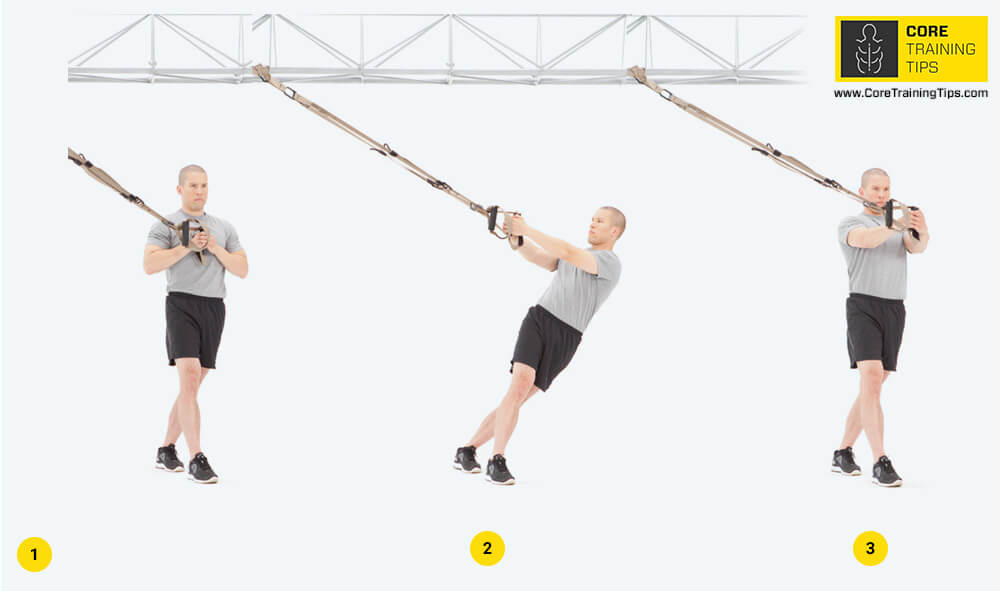
Setup: Single Handle Mode, facing the anchor, both hands on the joined handles with an overlapping grip, arms straight.
How to do it: lean back until the strap is taut. Turn your chest and arms to one side, letting the movement come from your upper back and hips, then return through the middle to the other side. Keep the strap tight the whole time.
Sets & reps: 2 × 8 per side, slowly.
Common mistake: twisting hard from the lower back. Keep the rotation smooth and only as far as feels easy.
Easier / harder: stand more upright and turn less / lean further back.
This move trains the third plane of motion, rotation, which most gym machines never touch. More on that in the 3 planes of motion in functional training.
9. TRX Single Leg Hip Hinge

Setup: mid length, facing the anchor, arms extended in front of you with light pressure down on the handles, standing on one leg with a soft knee.
How to do it: hinge forward from the hip, letting your free leg reach back and your arms reach forward along the straps, until your back is close to parallel with the floor or you feel a strong stretch in the standing hamstring. Drive your hip forward to stand back up, as if a string around your waist pulled you back to the start.
Sets & reps: 2 × 6–8 per side.
Common mistake: rounding the back to reach lower. Your back stays long, your hips go back.
Easier / harder: keep the toes of the back foot on the floor / pause for two seconds at the bottom.
10. TRX Figure 4 Stretch
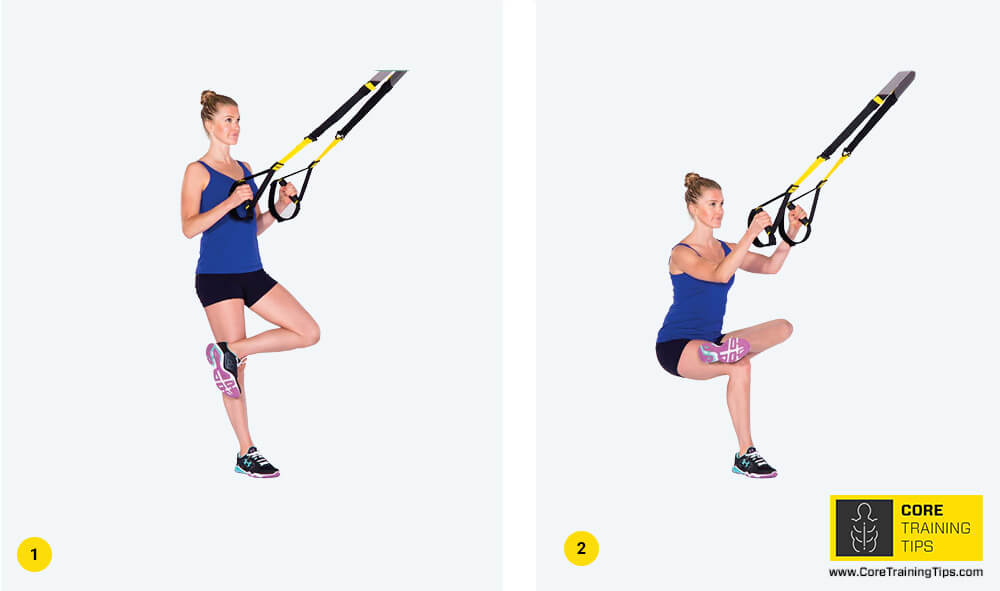
Setup: mid length, facing the anchor, feet shoulder-width apart, arms straight.
How to do it: cross your left ankle over your right thigh just above the knee. Sit back slowly as if into a chair, using the straps for balance, until you feel the stretch deep in your left glute. Hold for 3–5 breaths, then switch sides.
Sets & reps: 2 × 3–5 breaths per side.
Common mistake: collapsing the chest. Stay tall and let the hips do the sitting.
Easier / harder: sit back less / sit lower and lean your chest slightly forward.
Want more stretches like these? See the types of stretching and when to use each.
Two ready-made plans
Plan A: the 15-minute desk reset (daily or on stiff days)
Thirty seconds per exercise, only as long as it takes to adjust the straps between them. Start with one round and build to three over a couple of weeks.
| Order | Exercise | Strap length | Time |
|---|---|---|---|
| 1 | TRX Squat | Mid length | 30 s |
| 2 | TRX Hip Hinge Stretch | Mid length | 30 s |
| 3 | TRX High Row | Fully shortened | 30 s |
| 4 | TRX Standing Hip Drop | Mid length | 30 s (15 s per side) |
| 5 | TRX Torso Rotation | Single Handle Mode | 30 s |
| 6 | TRX Figure 4 Stretch | Mid length | 30 s (15 s per side) |
Plan B: the 20-minute strength session (2–3 times a week)
Do it on days when your back feels fine, with at least one rest day in between. Rest 30–45 seconds between sets.
| Order | Exercise | Strap length | Sets × reps |
|---|---|---|---|
| 1 | TRX Squat | Mid length | 3 × 10–12 |
| 2 | TRX High Row | Fully shortened | 3 × 10–12 |
| 3 | TRX Hip Press | Mid-calf | 3 × 8–12 |
| 4 | TRX Single Leg Hip Hinge | Mid length | 2 × 6–8 per side |
| 5 | TRX Plank | Mid-calf | 3 × 15–30 s |
| 6 | TRX Supine Plank | Foot cradles ~12 in off the floor | 2 × 15–30 s |
| 7 | TRX Torso Rotation | Single Handle Mode | 2 × 8 per side |
| 8 | TRX Hip Hinge Stretch + TRX Figure 4 Stretch | Mid length | 1–2 rounds, slow |
How to progress: first make each move harder by walking your feet a step further from the anchor, then add reps, and only then add a third round. If your back feels worse the next morning, go back a step for a week.

Prefer paper? Download the printable TRX office workout (PDF) and keep it next to your desk. For a full-body session on top of this, try the 30-minute TRX total body workout, which also has a free PDF.
Mistakes that make a sore back worse
- Chasing the stretch. More range isn’t better when your back is irritated. Comfortable range, every day, does more than one deep stretch that leaves you sore.
- Holding your breath. Breathe out on the effort and keep breathing in the holds. Bracing isn’t the same as holding your breath.
- Leaning on a weak anchor. A door that opens toward you, a hook that isn’t rated for body weight or a loose strap can drop you. Check how to anchor a TRX safely first.
- Doing the strength plan on a bad day. On days when the back is flaring, stick to Plan A, walks and the stretches.
- Sitting still all day and training for 20 minutes. Getting up every 30–60 minutes helps as much as the workout. Even one set of TRX Squats at your desk counts.
What you need to start
A suspension trainer and a solid anchor point, usually a closed door. Every exercise here works with the TRX HOME2 System, which comes with both a door anchor and a suspension anchor in the box. If you’re choosing between models, my TRX comparison sorts them out in a couple of minutes.
Buy only from the official TRX store, because cheap look-alike straps are where counterfeits end up, and a strap that fails under load is the last thing a bad back needs. Use my code TRX15LUKAS at checkout for 15% off your whole order. Here’s how to apply the TRX discount code step by step.
No straps yet? The squat to a chair, the floor glute bridge, the floor plank and the figure 4 stretch on a chair cover a lot of the same ground while you decide.
TRX for lower back pain: frequently asked questions
The bottom line
A sore lower back usually needs your hips and upper back to start moving again, not a fancier back exercise. Pick Plan A for stiff days, Plan B for strong days, stay in a comfortable range, and give it a few weeks. If you notice any of the warning signs, see a doctor before you train.